

GuideLeveraging Sanity's New Preview-Kit for Real-Time Previews with GatsbyJS
Welcome to this guide on harnessing the power of Sanity's brand-new preview-kit to create real-time previews for your GatsbyJS projects. It is a remarkable toolkit designed to craft dynamic content preview experiences with live-as-yous-type functionality and visual editing capabilities. Freshly released, it equips developers like you with the tools to elevate your preview experiences to the next level, all while enabling live and real-time previews specifically tailored for React-based projects.
In this guide, we'll walk you through the process of integrating Sanity's preview-kit seamlessly with GatsbyJS and deploying to Netlify, allowing you to offer a fluid and interactive content preview environment to your users. So, let's dive in and explore how you can revolutionize your content creation workflow with this cutting-edge toolkit.
If, at any point, you require assistance in implementing or expanding upon the concepts covered here, please don't hesitate to get in touch. We're here to help.
Assumptions
Before we proceed, here's what we're assuming:
- You have a Sanity account.
- You're familiar with Sanity Studio and Gatsby.
- You're comfortable with JavaScript, React, and the command line.
The results: What we're building
In this section, let's take a look at what we're aiming to achieve through this guide and the project we'll be working on.
Project Overview: Our goal is to create a simple blog site that serves as a practical example of integrating real-time preview capabilities. To help you visualize the process, we'll provide relevant screenshots and visuals.
Goals:
- Real-time editing experience: Editors should be able to get immediate real-time feedback, minimizing the delay between making changes and seeing their impact.
- Editing without friction: We want to eliminate the need for preview rebuilds on the Gatsby side. This enables an efficient content building loop.
- Preview in a split-pane: The real-time preview of the webpage will seamlessly integrate into Sanity Studio. We'll achieve this by utilizing an iframe within the Studio interface.
- Custom preview components: Editors will be kept informed via warnings and loading indicators, enabling them to work confidently.
Creating a new Sanity blog project
Let's dive into the exciting process of creating a new Sanity project from scratch.
If you're already familiar with the basics, feel free to jump ahead to the "Implementing previews both in the Sanity Studio and in the Gatsby frontend code" section, where we'll delve into the nitty-gritty of setting up previews in both the Sanity Studio and the Gatsby frontend code.
Here's how to get started:
- Create a project folder: Open your terminal and create a new folder for your project by running the following command: mkdir sanity-live-preview && cd sanity-live-preview
- Initiate a new Sanity project: Now, initiate a new Sanity project using npm by executing the command below. This command sets up the project with a template suitable for a blog website, complete with predefined schemas for "post": npm create sanity@latest -- --template blog --create-project "Sanity Live Preview" --dataset production
- Command overview:
- --template blog: Adds necessary schemas like "post" and "author".
- --create-project "Sanity Live Previews with Gatsby": Names the project "Sanity Live Previews with Gatsby".
- --dataset production: Sets the default project dataset as production (modifiable later as needed).
Follow the prompts during installation and add the required settings.
Once the installation concludes, run the following command to start the Sanity Studio:
npx sanity dev
This will set up a local instance of Sanity Studio, accessible at http://localhost:3333.
With these steps accomplished, you'll have initiated a new Sanity project for your blog. We're now ready to delve into the implementation process.

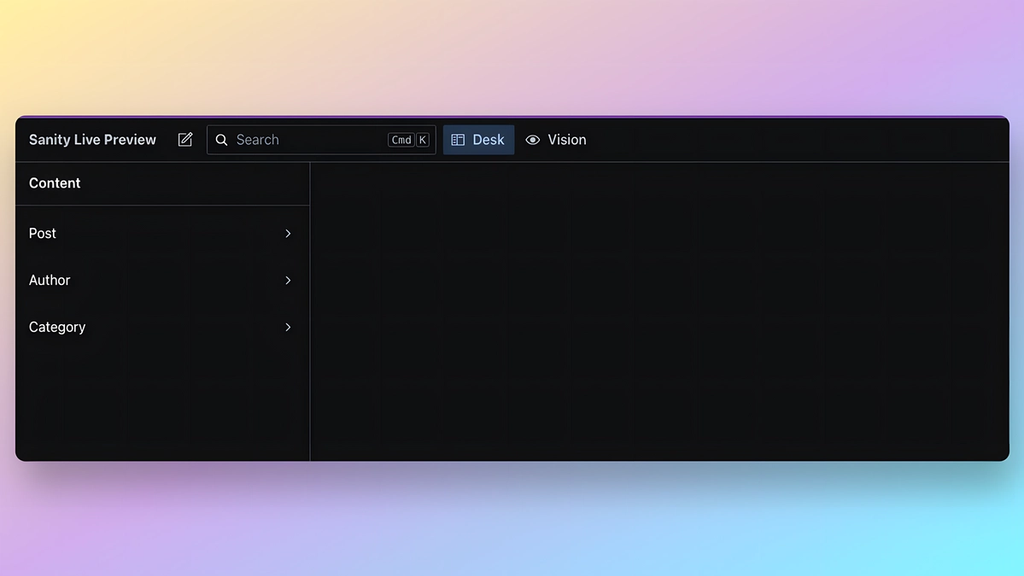
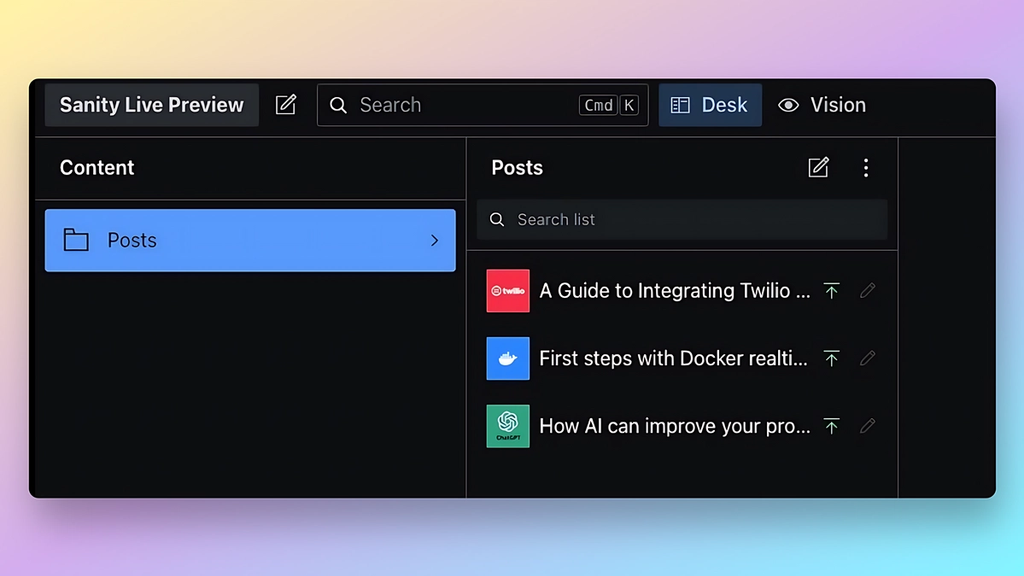
Add content to your Sanity Studio
Before we proceed, we need to add some content. Let's create a couple of posts to populate your blog.
To create a post, you can navigate to the Sanity Studio at http://localhost:3333, where you will find a dedicated section for managing your blog's content. Within this section, you can click on the "Posts" item. From here, you can click on the "Create New" button to create a new post.
In the post creation form, you will have fields to enter the title, content, featured image, category, tags, and any other relevant information for your blog post. Fill in the required fields and any additional details you want to include.
Once you have inputted all the necessary details, click on the "Publish" button to save your new post. Repeat this process to create a couple of posts for your blog.
Deploying the Sanity schema
Once you have made updates to your Sanity Studio and added content, the next step is to deploy the schema. Follow these steps:
- Make sure you are logged into your Sanity account using the Sanity CLI's login command. If you haven't done this already, you can find more information here.
- Open your terminal and navigate to your project folder (in this case, "sanity-live-preview").
- Run the following command to deploy the schema: npx sanity graphql deploy --no-playground
- The deploy command is used to deploy the schema changes you made in the Sanity Studio.
- The --no-playground option disables the GraphQL Playground, a tool for testing and exploring the GraphQL API.
- Wait for the deployment process to finish. Once it's done, you should see a success message.
Now, your Sanity schema is deployed and ready to be used in our project.
Creating a new Gatsby project
Now that we have the content in our Sanity Studio, let's create a new Gatsby project to display that content.
Follow these steps:
- Open your terminal and navigate to the desired location where you want to create the Gatsby project.
- Execute the following command and follow the prompts to initialize a new Gatsby project: npm init gatsby
- When prompted for the site name, enter "Gatsby Live Preview".
- Leave the folder name as the default value.
- Choose "JavaScript" as the language.
- When asked if you will be using a CMS, select "Sanity" and provide your project ID and dataset information. You can find this information by selecting your project in the Sanity Studio at https://www.sanity.io/manage. Remember to later move the relevant API keys into environment variables and avoid committing them to your git history.
- You also add the project ID and dataset information later in the gatsby-config.js file if you skipped the step.
- Choose "Tailwind CSS" as the styling system.
- Choose "Done" when asked about additional features with other plugins.
- Wait for the process to complete. Once it's done, you will see a success message.
- Move into the newly created directory using the following command: cd gatsby-live-preview
- To start the Gatsby app, run the following command: npx gatsby develop. After a few seconds, your Gatsby app should be up and running at http://localhost:8000.
Generating pages in Gatsby based on Sanity posts
Sanity works without a notion of a "page" because it's designed to be completely agnostic towards how you intend to showcase your content and through which platform. However, given that we're using Gatsby, it's likely that we need to create pages based on our content! So let’s dive into the steps.
- Create the gatsby-node.js file: To get started, create a file called gatsby-node.js at the root of your Gatsby project. This file will contain the necessary code to generate pages based on your Sanity posts.
- Add the necessary code to gatsby-node.js: Inside the gatsby-node.js file, you'll need to add the following code.
exports.createPages = async ({ graphql, actions }) => {
  const { createPage } = actions

  const result = await graphql(`
    {
      allSanityPost(filter: { slug: { current: { ne: null } } }) {
        edges {
          node {
            slug {
              current
            }
          }
        }
      }
    }
  `)

  // Handle any errors that occurred during the query
  if (result.errors) {
    throw result.errors
  }

  const posts = result.data.allSanityPost.edges || []

  // Create a page for each Sanity post
  posts.forEach((edge) => {
    const path = `/${edge.node.slug.current}`

    createPage({
      path,
      component: require.resolve("./src/templates/Post.jsx"),
      context: {
        slug: edge.node.slug.current,
      },
    })
  })
}
In this code, we're using the createPages function provided by Gatsby to generate pages based on our Sanity posts. We're querying for all Sanity posts and then using the createPage action to create a page for each post. The component property specifies the template component to use for rendering the individual post, and the context property is used to pass data to the template component, specifically the post's slug.
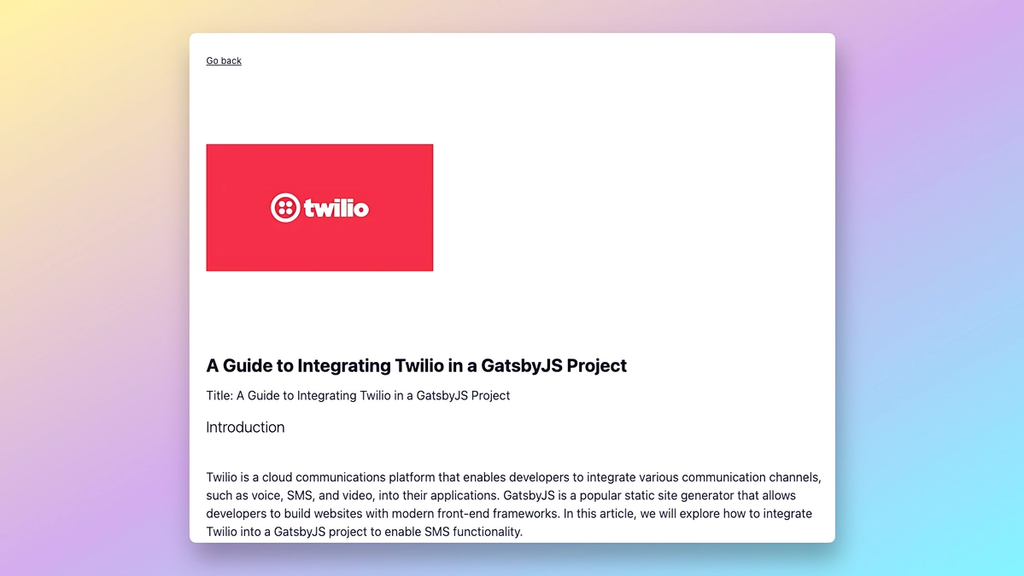
Creating a post template
To represent an individual post and style it using Tailwind CSS, you need to create a new file called Post.js inside the src/templates directory. This component is needed to define the template for rendering an individual post. It will receive the post data as props and render the necessary elements such as the post title, body, and any other relevant information. Here's the link to the Gatsby documentation that explains how to programmatically create pages: https://www.gatsbyjs.com/docs/programmatically-create-pages-from-data/#creating-pages
Copy the following code and in the new Post.js file:
import { Link, graphql } from "gatsby"
import React from "react"
import { PortableText } from "@portabletext/react"

const Post = ({ data }) => {
  const { title, _rawBody, mainImage } = data.sanityPost

  const portableTextComponents = {
    block: {
      normal: ({ children }) => <p className="text-gray-700">
        {children}
      </p>,
      h2: ({ children }) => <h2 className="my-4 text-xl font-light text-gray-800">
          {children}
        </h2>,
    },
  }

  return (
    <div className="min-h-screen p-6 bg-white">
      <Link to="/" className="text-xs text-gray-700 underline">
        Go back
      </Link>
      <div className="flex items-center w-full mt-6 mb-8">
        <img src={mainImage?.asset?.url} className="h-80" objectFit="contain"/>
      </div>
      <h1 className="mb-3 text-2xl font-bold text-gray-900">{title}</h1>
      <PortableText
        value={_rawBody || []}
        components={portableTextComponents}
      />
    </div>
  )
}

export const query = graphql`
  query ($slug: String!) {
    sanityPost(slug: { current: { eq: $slug } }) {
      title
      _rawBody
      mainImage {
        asset {
          url
        }
      }
      publishedAt
    }
  }
`
export default Post
In this code, we import the necessary dependencies such as Link and graphql from gatsby, React for the component, and PortableText for rendering the Sanity content (using the great react-portabletext package). The post component receives the post data from GraphQL and renders the title, body, and main image of the post.
Enabling Tailwind styling in our template
Open your tailwind.config.js file and update the content array to include the src/templates directory:
By including the src/templates directory in the content array, Tailwind CSS will be applied to files inside that directory.
module.exports = {
  content: [
    `./src/pages/**/*.{js,jsx,ts,tsx}`,
    `./src/components/**/*.{js,jsx,ts,tsx}`,
    `./src/templates/**/*.{js,jsx,ts,tsx}`,
  ],
  theme: {
    extend: {},
  },
  plugins: [],
}
With these changes, you now have the necessary code and styles to show an individual post using the Post.js template component in Gatsby.
Using <GatsbyImage> for the post image, instead of a regular <img> tag
Gatsby (specifically their gatsby-plugin-image) includes a component called <GatsbyImage> that provides several benefits for optimizing image loading and performance:
- Resize large images: The <GatsbyImage> component automatically resizes images to the size needed by your design, reducing the file size and improving loading times.
- Generate smaller images: Multiple smaller versions of the image are generated, so devices like smartphones and tablets don't need to download desktop-sized images.
- Strip unnecessary metadata and optimize compression: The component removes unnecessary metadata and optimizes JPEG and PNG compression to further reduce file size and improve loading speed.
- Efficient lazy loading: Images are lazily loaded, which means they are only loaded when they come into view, improving the initial page load time and saving bandwidth.
- Preview techniques: The component can use techniques like "blur-up" or a "traced placeholder" SVG to show a preview of the image while it loads, providing a better user experience (progressive enhancement).
- Maintain image position: The component holds the image position, preventing the page from jumping around while images load.
To properly use <GatsbyImage>, you need to obtain the necessary asset information to pass to the component. Fortunately, the Sanity source plugin provides a set of helper functions that make it easy to retrieve this information.
By leveraging the <GatsbyImage> component, you can significantly improve the performance and loading speed of your application while ensuring an optimal user experience.
You can find more information about using <GatsbyImage> and retrieving asset data from Sanity in the Gatsby and source plugin documentation
Let’s add the following into our Post.jsx component:
import { Link, graphql } from "gatsby"
import { GatsbyImage } from "gatsby-plugin-image"
import React from "react"
import { PortableText } from "@portabletext/react"

const Post = ({ data }) => {
  const { title, _rawBody, mainImage } = data.sanityPost

  const portableTextComponents = {
    block: {
      normal: ({ children }) => <p className="text-gray-700">
        {children}
      </p>,
      h2: ({ children }) => <h2 className="my-4 text-xl font-light text-gray-800">
          {children}
        </h2>,
    },
  }

  return (
    <div className="min-h-screen p-6 bg-white">
      <Link to="/" className="text-xs text-gray-700 underline">
        Go back
      </Link>
      <div className="flex items-center w-full mt-6 mb-8">
        <GatsbyImage
          image={mainImage?.asset?.gatsbyImageData}
          className="h-80"
          objectFit="contain"
        />
      </div>
      <h1 className="mb-3 text-2xl font-bold text-gray-900">
        {title}
      </h1>
      <PortableText
        value={_rawBody || []}
        components={portableTextComponents}
      />
    </div>
  )
}

export const query = graphql`
  query ($slug: String!) {
    sanityPost(slug: { current: { eq: $slug } }) {
      title
      _rawBody
      mainImage {
        asset {
          url
          gatsbyImageData(placeholder: BLURRED)
        }
      }
      publishedAt
    }
  }
`

export default Post
In the code above:
- The post component receives the data prop, which is the result of the GraphQL query.
- The GraphQL query is defined using export const query and Gatsby's graphql tag. It retrieves the title, _rawBody, mainImage, and publishedAt fields from the sanityPost object, with the slug value provided as a variable.
- The mainImage field includes the url of the image asset and uses gatsbyImageData to retrieve the optimized image data with a placeholder of type BLURRED.
You can find more information about the mechanism in Gatsby's documentation here.
We’re now showing our image by using the <GatsbyImage> component. Later in this guide we will come back to this component, as we need to adapt it for previews.
Styling the home page and listing all posts
The next step in our to-do list is to modify the default index.jsx file that stands for the homepage. Let's prepare it by adding some styling, and let's also add the required GraphQL logic for getting all available posts.
Open the index.jsx file and add the following code:
import React from "react"
import { Link, graphql } from "gatsby"
const IndexPage = ({ data }) => {
const posts = data.allSanityPost.nodes
return (
<div className="flex min-h-screen bg-gray-100">
<div className="flex flex-col gap-6 p-8">
{posts.map((post) => (
<div
key={post.id}
className="flex flex-col gap-y-3 p-6 bg-white rounded-lg shadow-md"
>
<div className="flex gap-x-4 mb-3">
<img
className="object-cover mr-3 w-12 h-12 rounded-full shadow-inner"
src={post.mainImage.asset.url}
alt={post.title}
/>
<div className="flex flex-col">
<h2 className="text-2xl font-semibold text-gray-900">
{post.title}
</h2>
<p className="text-sm text-gray-600">
{new Date(post.publishedAt).toLocaleDateString()}
</p>
</div>
</div>
<Link to={`${post.slug.current}`} className="text-sm text-gray-600">
Read more →
</Link>
</div>
))}
</div>
</div>
)
}
export default IndexPage
export const query = graphql`
query {
allSanityPost(sort: { fields: publishedAt, order: DESC }) {
nodes {
id
title
slug {
current
}
_rawBody
mainImage {
asset {
url
}
}
publishedAt
}
}
}
`
export const Head = () => <title>Home Page</title>This code modifies the homepage to display all available posts with appropriate styling and retrieves the post data using GraphQL.

It’s now time to move forward with the implementation of real-time previews.
What we accomplished so far
We've successfully created a functional Gatsby + Sanity page that allows us to retrieve and display posts stored in Sanity. We have styled the homepage and listed all available posts using GraphQL queries.
In the next steps, we are going to empower editors to preview the changes they are doing to that content in real-time directly within the Sanity Studio. Luckily, Sanity just built a powerful tool to enable us to do so easily.
Implementing previews both in the Sanity Studio and in the Gatsby frontend code
Time to get started with the implementation of the preview functionality by using Sanity's preview-kit.
Here is how the solution will work:
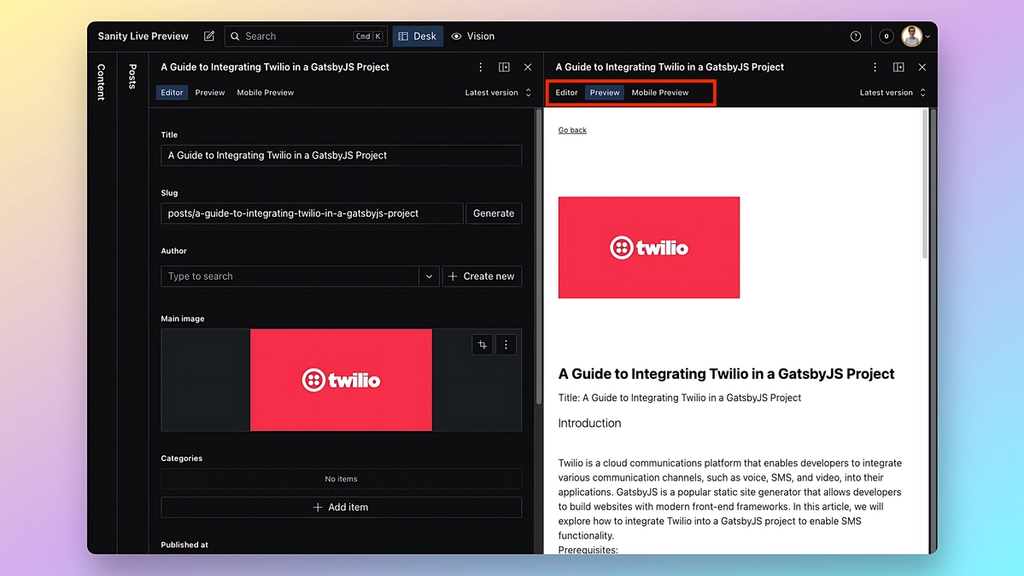
- We will first extend the built-in functionality of Sanity Studio by using custom views and split panes. These will be responsible for providing a real-time editing experience to users, as they'll fetch an updated version of the page with the new content on it. You can find more information about custom views and split panes in this Sanity blog post.
- The custom view will render an iframe that will display the page or piece of content the user is actually editing. This custom iframe view will also append the proper URL parameters so that we can later use them in the Gatsby frontend code.
- In the Gatsby frontend code, we will use these URL parameters to perform operations such as setting the preview mode and providing validation errors, as well as determining which dataset to use.
During the implementation, we will add the missing pieces needed for consuming and rendering draft documents directly with Gatsby.
Additionally, we will also cover cases such as reacting to slug changes of documents or handling completely newly created documents during preview mode.
Let’s get started!
Creating a custom view for previews in Sanity Studio
Let's go back to our sanity-live-preview Sanity Studio project and create a custom view for the preview functionality.
- Open the sanity.config.ts file in your project.
- Add the structure key to the deskTool plugin configuration to define a new custom structure for the deskTool. The updated sanity.config.ts file should look like this:
import { defineConfig } from 'sanity'
import { deskTool } from 'sanity/desk'
import { visionTool } from '@sanity/vision'
import { schemaTypes } from './schemas'
import deskStructure from './structure/deskStructure'

export default defineConfig({
  name: 'default',
  title: 'Sanity Live Preview',
  projectId: 'your-project-id',
  dataset: 'production',
  plugins: [deskTool({ structure: deskStructure }), visionTool()],
  schema: {
    types: schemaTypes,
  },
})
Adding deskStructure
- Create a new folder called structure in the root of your Studio project.
- Inside the structure folder, create a new file called deskStructure.js.
- Add the following code to the deskStructure.js file:
import { Views } from './views/preview'

export default (S, context) => {
  return S.list()
    .title('Content')
    .items(
      S.listItem()
        .title('Posts')
        .child(
          S.documentTypeList('post')
            .title('Posts')
            .child((id) => S.document().schemaType('post').documentId(id).views(Views(S, context)))
            .defaultOrdering([{ field: 'title', direction: 'asc' }])
        )
    )
}
The above code sets up the structure for the Sanity Studio deskTool plugin. It creates a list item for the "Posts" section, where the preview functionality will be available. The Views function is responsible for rendering the custom iframe view inside the Sanity Studio.
Defining custom views
- Inside the structure folder, create a new folder called views.
- Inside the views folder, create a new file named preview.js.
- Add the following code to the preview.js file:
import IframePreview from '../previews/IframePreview'

const remoteURL = 'YOUR_DEPLOY_URL' // either production or a specialized deploy branch for previews
const localURL = 'http://localhost:8000/' // local development port from Gatsby
const previewUrl = window.location.hostname === 'localhost' ? localURL : remoteURL

export const Views = (S, context) => {
  return [
    S.view.form(), // Default Sanity's form view for editing content
    S.view
      .component(IframePreview)
      .options({ previewUrl, isMobilePreview: false, context })
      .title('Preview'), // Iframe custom view for desktop screens
    S.view
      .component(IframePreview)
      .options({ previewUrl, isMobilePreview: true, context })
      .title('Mobile Preview'), // Iframe custom view for mobile screens
  ]
}
The <IframePreview> component
The <IframePreview> component is a key part of the preview system for Gatsby sites using Sanity CMS. By utilizing an iframe, the component creates a separate window where the website preview is displayed.
Follow these steps to implement the <IframePreview> component:
- Inside the structure folder, create a new folder called previews.
- Inside the previews folder, create a new file named IframePreview.jsx.
- Add the following code to the IframePreview.jsx file:
import React, { useState, useEffect } from 'react'
import { useValidationStatus } from 'sanity'

// Function to assemble the preview URL based on the displayed object
const assembleProjectUrl = ({ displayed, context, previewUrl, validation, isNewUnpublishedDoc }) => {
  // Construct the base preview URL
  const basePreviewUrl = previewUrl
  const slug = displayed?.slug?.current
  const validationArray = encodeURIComponent(JSON.stringify(validation))

  // Check if slug or basePreviewUrl is missing
  if (!slug || !basePreviewUrl) {
    console.warn('Missing slug or previewURL', { slug, basePreviewUrl })
    return ''
  }

  // Append the slug to the base URL to get the final page preview URL
  const finalPagePreviewUrl = `${basePreviewUrl}${slug !== '/' ? slug : ''}`

  return `${finalPagePreviewUrl}?previewMode=true&previewDataset=${context.dataset}&validation=${validationArray}&isNewUnpublishedDoc=${isNewUnpublishedDoc}`
}

// Component for rendering an iframe preview
const IframePreview = ({ document, options }) => {
  const [url, setUrl] = useState(null)
  const { isMobilePreview, context, previewUrl } = options

  // Get validation status
  const { isValidating, validation } = useValidationStatus(
    document?.published?._id || document?.displayed?._rev || document?.displayed?._id?.replace('drafts.', ''),
    document?.published?._type || document?.displayed?._type
  )

  const isNewUnpublishedDoc = !document?.published?._id

  // Update the URL when the document prop changes
  useEffect(() => {
    const { displayed } = document

    setUrl(assembleProjectUrl({ displayed, context, previewUrl, validation, isNewUnpublishedDoc }))
  }, [document, validation])

  const { displayed } = document

  // Render a message if there is no document to preview
  if (!displayed) {
    return (
      <div
        style={{
          display: 'flex',
          flexDirection: 'column',
          justifyContent: 'center',
          alignItems: 'center',
          height: '100%',
          width: '100%',
        }}
      >
        <p>There is no document to preview</p>
      </div>
    )
  }

  // Render a message if there is a problem with the URL
  if (!url) {
    return (
      <div
        style={{
          display: 'flex',
          flexDirection: 'column',
          justifyContent: 'center',
          alignItems: 'center',
          height: '100%',
          width: '100%',
          padding: '10px',
        }}
      >
        <p>
          There has been a problem constructing the web front-end URL. Please reselect the preview.
        </p>
      </div>
    )
  }

  // Render the iframe preview
  return (
    <>
      <div
        style={{
          width: '100%',
          height: '100%',
          display: 'flex',
          flexDirection: 'column',
          justifyContent: 'center',
          alignItems: 'center',
        }}
      >
        <div
          style={{
            width: '100%',
            height: '100%',
            maxWidth: isMobilePreview ? '360px' : 'none',
            maxHeight: isMobilePreview ? '800px' : 'none',
            transformOrigin: 'center',
            transform: isMobilePreview ? 'scale(1.3)' : 'none', // Scale the iframe size if it's a mobile preview
          }}
        >
          <iframe
            title="Iframe-preview-noa"
            src={url}
            frameBorder="0"
            allow="clipboard-write"
            style={{ width: '100%', height: '100%' }}
          />
        </div>
      </div>
    </>
  )
}

export default IframePreview
By following the above steps, you have created a custom view for the preview functionality in Sanity Studio. You should now see three available views on each blog post: "editor", "preview", and "mobile preview".
These views can be used as separate panes, with the form on the left-side and the preview on the right-side.
Implementing the real-time preview with Sanity preview-kit
The next step is to query and display Sanity draft content.
First, we will need to install a few packages into our Gatsby project:
yarn add @sanity/client @sanity/preview-kit classnames
Make sure to use as version either @^4 or above @^6.4.2 because versions in between fail due to a webpack error (refer to this link for more information about the issue).
The packages that will be installed are:
- @sanity/client: A package to simplify querying from (and sending mutations to) Sanity.
- @sanity/preview-kit: A collection of helpful functions to make live previews simple from inside a React application.
- classnames: A utility function that we will use later for conditional styling.
Next, let's create a new file to store your project configuration and initialize the Sanity client. Create a folder named sanityUtils at the root of your Gatsby project, and inside that folder, create a file called sanity.js. Add the following code to the sanity.js file:
import { createClient } from "@sanity/client"

const projectId = "your-project-id"
const envDataset = "your-project-dataset"
const apiVersion = "2023-07-01"

export function getSanityPreviewClient(
  preview,
  previewDataset = envDataset
) {
  const client = createClient({
    projectId,
    dataset: previewDataset,
    apiVersion,
    useCdn: false, // to ensure data is fresh
    token: preview.token,
  })

  return client
}
In the code above, replace "your-project-id" with the actual project ID of your Sanity project, and replace "your-project-dataset" with the dataset you are using in your project. Please remember to do so for other code examples throughout this guide.
With this setup, you now have the necessary packages installed, and the Sanity client initialized for real-time querying and displaying of draft content in your Gatsby project.
Query documents using Sanity client
To query the posts, we will be using the Sanity client. The Sanity client fetches the data we need by using GROQ, a query language created by the Sanity team. We can create corresponding GraphQL queries from the GROQ equivalent queries, which is made easier by GROQ's ability to explicitly return all attributes using its ... operator.
This implies that we don't have to replicate each and every GraphQL query and painstakingly specify every field we intend to use.
We need only to specify fields where we need to resolve references (e.g. for images) or have differences in data structure between Sanity and Gatsby's GraphQL layer. However, for the sake of this example, we have included all fields in the query below.
You can find a helpful GROQ cheat sheet here.
To get started, let's create a new file named documentQueries.js inside a new folder called queries located in the src directory. This file will contain all the queries available for us to reuse and extend if needed. Add the following code to the documentQueries.js file:
export const postQuery = `*[_type == "post" && slug.current == $slug][0] {
  ...,
  title,
  body,
  mainImage {
    asset->,
  },
}`
In the code above, postQuery is a GROQ query that retrieves a post based on its slug. This query will fetch the post's title, body, and main image.
Before we perform a test request to ensure that our setup is working properly, we need to enable CORS access in the Sanity project dashboard. You can find more information on how to enable CORS here. Please also be aware of the security implications outlined in this document.
To do so:
- Navigate to the API tab in the Sanity project dashboard at Manage | Sanity.io.
- Enter http://localhost:8000 and http://localhost:9000 for local development and production builds for testing, and add any other URLs (e.g., dedicated preview deploy branch URLs) you want to use for previews.
- Check the "Allow credentials" checkbox.
- Save the settings.
Additionally, you can test GROQ queries easily in Sanity's Vision plugin.
With these steps completed, we now have the necessary query in place and can move forward to testing our setup.
Performing our first test request
Let’s now modify our post component and let’s add a useEffect for performing a test request via Sanity client.
import { Link, graphql } from "gatsby"
import { GatsbyImage } from "gatsby-plugin-image"
import React, { useEffect } from "react"
import { PortableText } from "@portabletext/react"
import { getSanityPreviewClient } from "../../sanityUtils/sanity"
import { postQuery } from "../queries/documentQueries"

const Post = ({ data }) => {
  const { title, _rawBody, mainImage, slug } = data.sanityPost

  const portableTextComponents = {
    block: {
      normal: ({ children }) => <p className="text-gray-700">
        {children}
      </p>,
      h2: ({ children }) => <h2 className="my-4 text-xl font-light text-gray-800">
        {children}
      </h2>,
    },
  }

  useEffect(() => {
    const fetchData = async () => {
      console.log("slug:", slug.current)
      const client = getSanityPreviewClient()
      const post = await client.fetch(postQuery, { slug: slug.current })
      console.log("post:", post)
    }

    fetchData()
  }, [slug])

  return (
    <div className="min-h-screen p-6 bg-white">
      <Link to="/" className="text-xs text-gray-700 underline">
        Go back
      </Link>

      <div className="flex items-center w-full mt-6 mb-8">
        <GatsbyImage
          image={mainImage?.asset?.gatsbyImageData}
          className="h-80"
          objectFit="contain"
        />
      </div>

      <h1 className="mb-3 text-2xl font-bold text-gray-900">
        {title}
      </h1>

      <PortableText
        value={_rawBody || []}
        components={portableTextComponents}
      />
    </div>
  )
}

export const query = graphql`
  query($slug: String!) {
    sanityPost(slug: { current: { eq: $slug } }) {
      title
      _rawBody
      mainImage {
        asset {
          url
          gatsbyImageData(placeholder: BLURRED)
        }
      }
      publishedAt
    }
  }
`

export default Post
In the modified <Post> component, we have added a useEffect hook to perform a test request using the Sanity client.
With these modifications in place, when you access the post page, you should see the related post information logged in the console. This can help verify that the setup is working correctly.
Setting up a PreviewContext for manipulating preview state across multiple components
Since we have confirmed that the Sanity client can fetch non-draft documents successfully, we can now enhance our component architecture to enable state sharing across the entire component hierarchy and avoid the need for excessive prop-drilling.
To begin, we will create a file named PreviewContext.jsx that will be responsible for managing the application state related to the preview functionality.
To achieve this, follow these steps:
- Open your project and locate the src folder.
- Within the src folder, create a new folder called context.
- Inside the context folder, create a new file named PreviewContext.jsx.
In this PreviewContext.jsx file, we will define the necessary code to establish and manage the PreviewContext.
// PreviewContext.jsx

import React, { createContext, useState } from "react"
import PreviewIndicator from "./PreviewIndicator"

// Set up the default context object
const defaultContext = {
  activePreview: "",
  setActivePreview: "",
  previewContextData: "",
  setPreviewContextData: "",
  previewIsLoading: "",
  setPreviewIsLoading: "",
}

// Create the PreviewContext using createContext
const PreviewContext = createContext(defaultContext)

// Define the PreviewProvider component
const PreviewProvider = ({ children }) => {
  // Set up state variables using useState
  const [activePreview, setActivePreview] = useState(false)
  const [previewIsLoading, setPreviewIsLoading] = useState(false)
  const [previewContextData, setPreviewContextData] = useState({
    previewContextDataset: "production" // Adapt if you have another default dataset name
  })
  const [previewValidationData, setPreviewValidationData] = useState([])
  const [isNewUnpublishedDoc, setIsNewUnpublishedDoc] = useState(false)

  // Render the PreviewProvider component
  return (
    <PreviewContext.Provider
      value={{
        activePreview,
        setActivePreview,
        previewContextData,
        setPreviewContextData,
        previewIsLoading,
        setPreviewIsLoading,
        previewValidationData,
        setPreviewValidationData,
        isNewUnpublishedDoc,
        setIsNewUnpublishedDoc
      }}
    >
      {children}
      {/* Render the PreviewIndicator component when activePreview is true */}
      {activePreview && <PreviewIndicator isLoading={previewIsLoading} />}
    </PreviewContext.Provider>
  )
}

export { PreviewContext, PreviewProvider }
In the code above, we create a <PreviewContext> component using the createContext function from React. This context is responsible for managing the application state related to the preview functionality.
We also defined a <PreviewProvider> component that wraps the application and provides the preview-related state values to all the components in the component hierarchy. Inside the PreviewProvider, we use the useState hook to set up the initial state for the preview.
The state variables include activePreview to track whether the preview mode is active, previewIsLoading to track whether the preview is currently loading, previewContextData to hold the preview context data (such as the dataset name), previewValidationData to store the validation data for the preview, and isNewUnpublishedDoc to track whether the document being previewed is a new unpublished document.
The <PreviewProvider> component renders a <PreviewContext.Provider> with the mentioned context values. It also renders the <PreviewIndicator> component when activePreview is true, indicating that the preview mode is active. This allows for consistent rendering of the preview indicator across multiple components.
Finally, we export both the PreviewContext and PreviewProvider for use in other components.
Now, under the same folder, we will create a component called "PreviewIndicator", which will be responsible for showing the loading state of the draft document.
Create a file called PreviewIndicator.jsx and add the following:
// PreviewIndicator.jsx

import React from "react"
import cx from "classnames"

export default function PreviewIndicator({ isLoading = false }) {
  return (
    <div className="fixed inset-0 flex items-end justify-center w-screen h-screen pointer-events-none z-140">
      <span className="inline-flex items-center gap-x-1.5 rounded-md px-2 py-1 text-xxxs sm:text-xs font-light text-gray-900 ring-1 ring-inset bg-white mb-6">
        <svg
          className={cx(
            "w-2 h-2 bg-white transition-all duration-1000 animate",
            {
              "animate-pulse fill-yellow-500": isLoading,
              "fill-green-500": !isLoading,
            }
          )}
          viewBox="0 0 6 6"
          aria-hidden="true"
        >
          <circle cx={3} cy={3} r={3} />
        </svg>
        {isLoading ? "Preview is loading" : "Preview up-to-date"}
      </span>
    </div>
  )
}
Adding the <SanityPreviewConnector> component
To handle the rendering logic based on the active mode, we will create a file called SanityPreviewConnector.jsx. This component will either pass the children if the preview mode is not active, or wrap the children in the LiveQueryProvider if the preview mode is active. It also enables the fetching of draft documents client-side based on the available state in PreviewContext.
Follow these steps to create the SanityPreviewConnector.jsx component:
- Inside your components folder, create a new folder called preview.
- Inside the preview folder, create a new file named SanityPreviewConnector.jsx.
- Add the following code to the SanityPreviewConnector.jsx file:
import { LiveQueryProvider } from "@sanity/preview-kit"
import React, { useContext } from "react"
import { getSanityPreviewClient } from "../../../sanityUtils/sanity"
import { PreviewContext } from "../../context/PreviewContext"

export default function SanityPreviewConnectorProvider({ children, token }) {
  const { activePreview, previewContextData } = useContext(PreviewContext)
  const client = getSanityPreviewClient(
    { token },
    previewContextData?.previewDataset
  )

  if (!activePreview) {
    // Return the regular children with no draft documents
    return <>{children}</>
  }

  // Preview mode enabled
  return (
    <LiveQueryProvider client={client}>
      {children}
    </LiveQueryProvider>
  )
}
If the preview mode is not active, the component simply renders the children without any draft documents.
If the preview mode is active, the component wraps the children in LiveQueryProvider and passes the client obtained from getSanityPreviewClient. This allows for the fetching of draft documents in preview mode.
Finally, we export the <SanityPreviewConnectorProvider> component for use in other parts of the application.
Connecting the dots using gatsby-browser.js
Now that we have prepared our context and preview connector to be globally accessible in our application, we can proceed with the final step of structuring our component hierarchy and working on the last aspects of the integration.
To make the necessary connections, follow these steps:
- Open your gatsby-browser.js file.
- Add the following code to the file:
import React from "react"
import "./src/styles/global.css"
import SanityPreviewConnectorProvider from "./src/components/Preview/SanityPreviewConnector"
import { PreviewProvider } from "./src/context/PreviewContext"

export const wrapRootElement = ({ element }) => {
  return (
    <PreviewProvider>
      <SanityPreviewConnectorProvider token={process.env.YOUR_SECRET_TOKEN}>
        {element}
      </SanityPreviewConnectorProvider>
    </PreviewProvider>
  )
}
We use the wrapRootElement function provided by Gatsby to wrap our entire application with the necessary providers.
PreviewProvider is responsible for providing the context needed for the preview functionality.
Next, SanityPreviewConnectorProvider is used to determine which mode (preview or live) should be active and handle the rendering logic accordingly. It receives the token prop, which should be your secret token. It is important to use environment variables for this token to ensure security. Please refer to the Sanity documentation for more information on how to generate your secret key.
Finally, we render the element within the nested providers.
Please ensure that you have added a viewer token (with no write access) in the Sanity.io tokens section. Take caution when handling these kind of tokens, as they provide special permissions.
With these connections in place, we have now established the necessary foundation for integrating Sanity preview functionality in our Gatsby application.
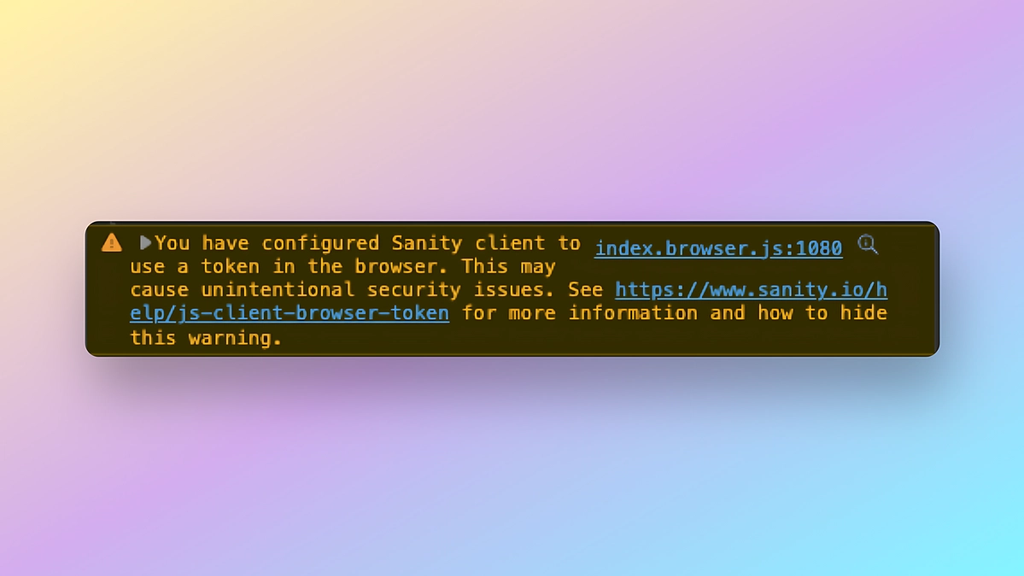
Protecting your Sanity Token
It is essential to protect your sanity private token to ensure the security of your Content Management System, protect your business information, and ensure only authorized access to your data.
To protect your token, keep it confidential and never share it with anyone.
Additionally, avoid storing the token in the codebase, as it may become part of the application bundle and be publicly accessible.
For more information, please visit:
Securing your setup
To ensure that only authorized users are able to access the preview data, we employ the use of the client.config({withCredentials: true}) method. This method allows us to authenticate and validate the user's login status within the studio environment.
By using client.config({withCredentials: true}), we can confirm that the user has already logged into the studio before displaying any preview data. There's no need for a token with this method, and we added an extra layer of security, ensuring that only authenticated users can access the preview content while not exposing the preview token client-side.
Let's take a look at the implementation:
- Go to your sanity.ts file, and remove the token attribute in your getSanityPreviewClient's createClient() function, as this approach needs no token to work.
- Then, open your SanityPreviewConnector.jsx file, and add the following useEffect:
import { LiveQueryProvider } from "@sanity/preview-kit"
import React, { useContext, useEffect } from "react"
import {
  getSanityClient,
  getSanityPreviewClient,
} from "../../../sanityUtils/sanity"
import { PreviewContext } from "../../context/PreviewContext"

export default function SanityPreviewConnectorProvider({ children, token }) {
  const { activePreview, previewContextData } = useContext(PreviewContext)

  useEffect(() => {
    async function getSanityUserData() {
      const response = await getSanityClient()
        .config({ withCredentials: true })
        .users.getById("me")
    }
    getSanityUserData()
  }, [])

  if (!activePreview) {
    return <>{children}</> // Return regular children without draft documents
  }

  const client = getSanityPreviewClient(previewContextData?.previewDataset)

  return <LiveQueryProvider client={client}>{children}</LiveQueryProvider> // Preview mode enabled
}
- The getSanityUserData() function retrieves the user data from the Sanity using the cookies stored in the browser. This data includes information about the logged-in user, such as their username, email, and any other relevant details. Once the user's data is retrieved, any future application request will be done on behalf of that logged-in user. This function ensures that the user is authenticated with Sanity and has the necessary cookies stored in their browser. If the user is not logged in or the cookies are not available, they can't access the preview content.
Fetch draft content for posts
Now that everything is set up, we can fetch the draft information we need in our post component. However, there are a couple of aspects to consider before proceeding with the implementation:
- <GatsbyImage> component: The <GatsbyImage> component requires an object with asset information in a specific structure. Since we are now fetching information directly from Sanity using the Sanity client instead of the gatsby-source-sanity plugin, the data structure is slightly different. To construct the required structure, you can use the getGatsbyImageData function provided by the gatsby-source-sanity plugin. The post component will have all the necessary information to make this work. You can find a reference to the function here.
- _raw fields: When fetching information directly from Sanity, there are no _raw fields available. As a result, we need to adapt our post component to use either _rawBody or body, depending on the active mode. The post component should handle these adaptations to ensure that our <PortableText> component works in both scenarios. You can find a reference to raw fields here.
It might be a good idea to handle these differences in a wrapper component to avoid repeating the conditional logic throughout the code base.
Now that we have explained the key differences while implementing the <GatsbyImage> component or any _raw field-dependent component, let's proceed by adding the code needed to fetch our draft post.
import { Link, graphql } from "gatsby"
import React, { useEffect, useContext } from "react"
import { PortableText } from "@portabletext/react"
import { postQuery } from "../queries/documentQueries"
import { PreviewContext } from "../context/PreviewContext"
import { useLiveQuery } from "@sanity/preview-kit"
import { InformationCircleIcon } from "@heroicons/react/24/solid"
import { GatsbyImage } from "gatsby-plugin-image"
import { getGatsbyImageData } from "gatsby-source-sanity"

const Post = ({ data }) => {
  const [previewData, sanityPreviewIsLoading] = useLiveQuery(null, postQuery, {
    slug: data.sanityPost.slug.current,
  })

  const {
    setActivePreview,
    setPreviewContextData,
    setPreviewIsLoading,
    setPreviewValidationData,
    setIsNewUnpublishedDoc,
    isNewUnpublishedDoc,
  } = useContext(PreviewContext)

  useEffect(() => {
    setPreviewIsLoading(sanityPreviewIsLoading)
  }, [sanityPreviewIsLoading])

  const sanityConfig = { projectId: "YOUR_PROJECT_ID", dataset: "production" }

  const portableTextComponents = {
    block: {
      normal: ({ children }) => <p className="text-gray-700">
        {children}
      </p>,
      h2: ({ children }) => <h2 className="my-4 text-xl font-light text-gray-800">
        {children}
      </h2>,
    },
  }
  useEffect(() => {
    // Get URL params
    const urlSearchParams = new URLSearchParams(window.location.search)
    const previewModeParameter = urlSearchParams.get("previewMode")
    const previewDatasetParameter = urlSearchParams.get("previewDataset")
    const previewValidationDataParameter = urlSearchParams.get("validation")
    const previewIsNewUnpublishedDocParameter =
      urlSearchParams.get("isNewUnpublishedDoc") === "true"

    if (previewValidationDataParameter) {
      setPreviewValidationData(JSON.parse(previewValidationDataParameter))
    }

    if (previewModeParameter) {
      setActivePreview(true)
    }
    if (previewDatasetParameter) {
      setPreviewContextData({ previewDataset: previewDatasetParameter })
    }

    if (previewIsNewUnpublishedDocParameter) {
      setIsNewUnpublishedDoc(previewIsNewUnpublishedDocParameter)
    }
  }, [])

  // Show a Loading message
  if (sanityPreviewIsLoading) {
    return <div>Loading...</div>
  }

  // Non published document message
  if (!sanityPreviewIsLoading && isNewUnpublishedDoc) {
    return (
      <div className="p-4 mt-12 rounded-md bg-yellow-50">
        <div className="flex">
          <div className="flex-shrink-0">
            <InformationCircleIcon
              className="w-5 h-5 text-yellow-700"
              aria-hidden="true"
            />
          </div>
          <div className="ml-3">
            <h3 className="mb-2 font-medium text-yellow-700 text-xxxxs">
              <b>Preview mode info</b>
            </h3>
            <h3 className="font-medium leading-snug text-yellow-700 text-xxxxs">
              You have created a new document that isn't yet published. Please
              publish to access preview mode.
            </h3>
          </div>
        </div>
      </div>
    )
  }

  return (
    <div className="min-h-screen p-6 bg-white">
      <Link to="/" className="text-xs text-gray-700 underline">
        Go back
      </Link>
      <div className="flex items-center w-full mt-6 mb-8">
        <GatsbyImage
          image={
            getGatsbyImageData(
              previewData?.mainImage?.asset?._id,
              {},
              sanityConfig
            ) || data.sanityPost.mainImage?.asset?.gatsbyImageData
          }
          className="h-80"
          objectFit="contain"
          alt={"post cover"}
        />
      </div>
      <h1 className="mb-3 text-2xl font-bold text-gray-900">
        {previewData?.title || data.sanityPost.title}
      </h1>
      <PortableText
        value={previewData?.body || data.sanityPost._rawBody || []}
        components={portableTextComponents}
      />
    </div>
  )
}

export const query = graphql`
  query ($slug: String!) {
    sanityPost(slug: { current: { eq: $slug } }) {
      title
      _rawBody
      mainImage {
        asset {
          gatsbyImageData(placeholder: BLURRED)
          url
        }
      }
      slug {
        current
      }
      publishedAt
    }
  }
`

export default Post
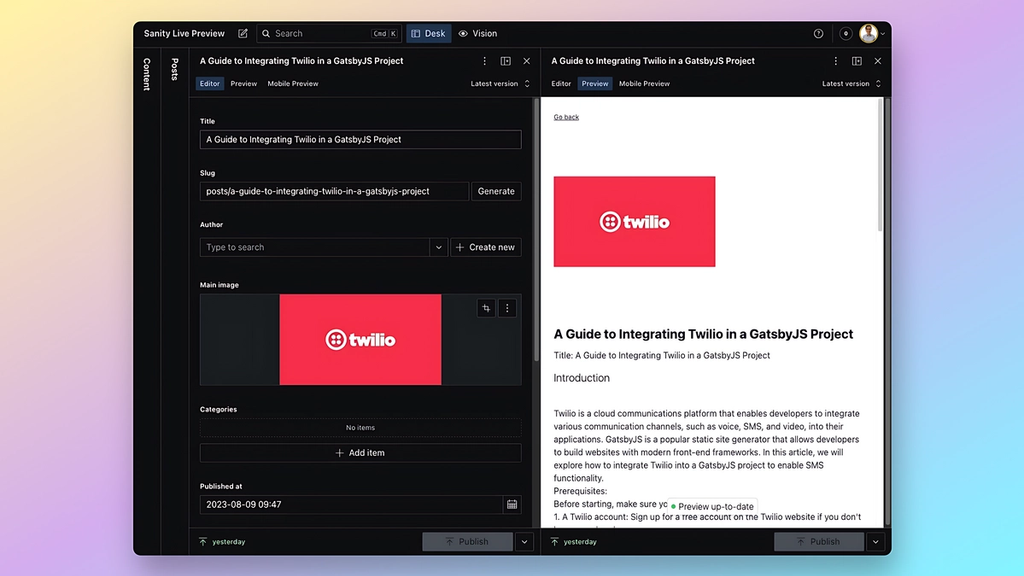
Live previews are now implemented in your Gatsby project!
Managing newly created documents & slug changes for draft documents via 404 page
When users create pages or posts that don't yet exist or change the document slug, it can result in a 404 error since that page is not built by Gatsby yet. To handle this case, we can introduce handling for such cases into the 404 mechanism.
In the 404 file Gatsby has created for you during project initialization, add the following code:
import React, { useEffect, useContext } from "react"
import { Link } from "gatsby"
import { PreviewContext } from "../context/PreviewContext"
import Post from "../templates/Post"

const pageStyles = {
  color: "#232129",
  padding: "96px",
  fontFamily: "-apple-system, Roboto, sans-serif, serif",
}

const headingStyles = {
  marginTop: 0,
  marginBottom: 64,
  maxWidth: 320,
}

const paragraphStyles = {
  marginBottom: 48,
}

const codeStyles = {
  color: "#8A6534",
  padding: 4,
  backgroundColor: "#FFF4DB",
  fontSize: "1.25rem",
  borderRadius: 4,
}

const NotFoundPage = () => {
  const {
    activePreview,
    setActivePreview,
    setPreviewContextData,
    setPreviewValidationData,
  } = useContext(PreviewContext)

  const getSlug = (url: string) => new URL(url).pathname.match(/[^\/]+/g)

  useEffect(() => {
    const urlSearchParams = new URLSearchParams(location.search)
    const previewModeParameter = urlSearchParams.get("previewMode")
    const previewDatasetParameter = urlSearchParams.get("previewDataset")
    const previewValidationDataParameter = urlSearchParams.get("validation")

    if (previewValidationDataParameter) {
      setPreviewValidationData(JSON.parse(previewValidationDataParameter))
    }

    if (previewModeParameter) {
      setActivePreview(true)
    }

    if (previewDatasetParameter) {
      setPreviewContextData({ previewDataset: previewDatasetParameter })
    }
  }, [])

  if (activePreview) {
    const pageData = {
      sanityPost: {
        slug: {
          current: getSlug(window.location.href)?.join("/"),
        },
      },
    }

    return <Post data={pageData}></Post>
  }

  return (
    <main style={pageStyles}>
      <h1 style={headingStyles}>Page not found</h1>
      <p style={paragraphStyles}>
        Sorry, we couldn’t find what you were looking for.
        <br />
        {process.env.NODE_ENV === "development" ? (
          <>
            <br />
              Try creating a page in
              <code style={codeStyles}>
                src/pages/
              </code>.
            <br />
          </>
        ) : null}
        <br />
        <Link to="/">Go home</Link>.
      </p>
    </main>
  )
}

export default NotFoundPage
The code above handles the case of newly created documents or slug changes by getting the new slug from the URL that is sent from our <IframePreview> component in the Sanity Studio. It then passes that slug down to our <Post> component, which uses the slug to fetch the corresponding post data using the useLiveQuery hook. Add other page types as required and you are good to go!
Deploying to Netlify
With the completion of our Sanity's preview-kit setup, let's next deploy our results to Netlify by following these steps.
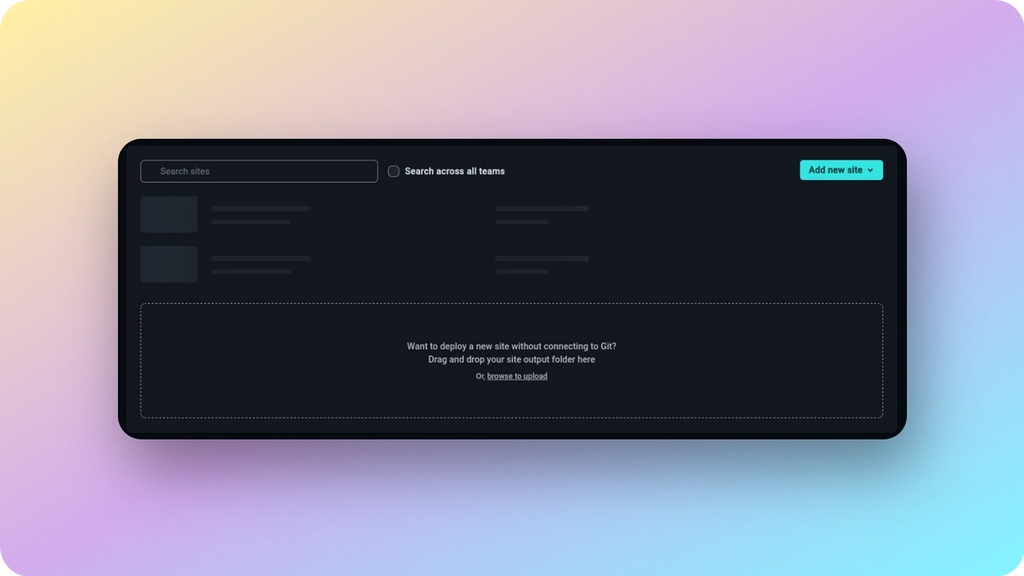
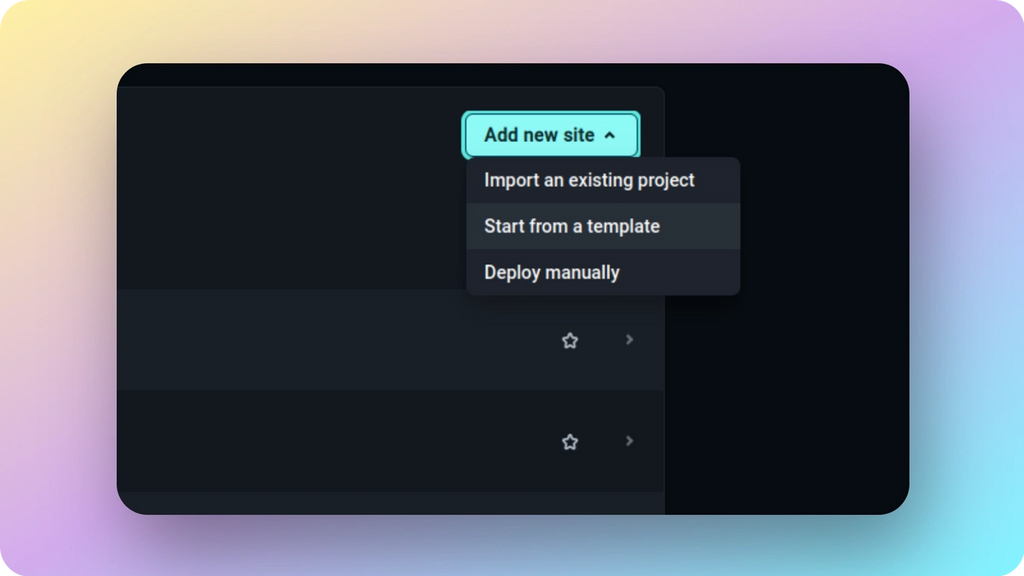
- Login to your Netlify dashboard and click on "Add new site" and then "Import an existing project".
- Choose your Git provider and repository.
- Netlify will detect it as a Gatsby project. Keep the default settings and click "Deploy".
Once deployed, your Gatsby site will be live on Netlify. After you have added your deploy URL to the Sanity Studio environmental variable, your team can now benefit from your newly created real-time preview experience!
Conclusion
During this guide, we have accomplished the implementation of a powerful preview system for Gatsby sites using Sanity CMS. This preview system allows content editors to see a real-time preview of their changes before publishing, eliminating the need for a build pipeline and reducing friction in the content creation process.
Compared to other preview setups that relied on build pipelines, this approach offers significant improvements. It eliminates the need to rebuild the entire website for each content change, resulting in faster iteration cycles and reducing the time required to see the preview.
If you found this guide helpful, make sure to check out other Kasayo guides, such as how to create a color design system for your editors using Sanity or our case study about monitoring, and automated testing for a large Canadian eCommerce brand.
If you need assistance in implementing a similar preview system (or extend it) or any other custom systems for your platform, don't hesitate to reach out to Kasayo. We are here to support you and provide tailored solutions to meet your specific requirements.